Ben McCarl
  • Home
  • Winterstone
  • Soapstone
  • Alabaster
  • Clay
  • Pictures
  • Blog
  • Contact

Creating Details

11/24/2012

1 Comment

 
Picture
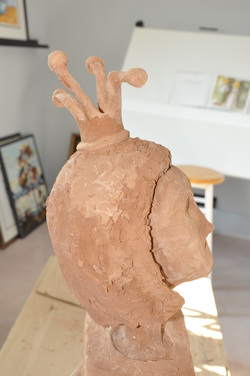
The base coat of the crown was complete and ready from me to begin forming details.  After applying a smoother coat the crown's prongs I added a blob of clay to the end of each and formed them into tiny balls.  Once they were dry I added a second coat to the balls to make them rounder.  Finally I added a rim around the base of the crown to make it look more regal.

To give the bag character, I built up the Winterstone around the neck and arms to create the appearance of holes in the bag.

Next I applied the first layer of Winterstone icing to the face.  Icing is similar to clay but is less grainy when dry and can be sanded into a beautifully smooth surface.  I applied the icing with a knife, shaped and smoothed it as much as possible then smoothed and shaped it with my fingers.  After shaping her forehead I used my right index finger to shape her left eyebrow then with my left index finger I shaped her right eyebrow.  I find that I achieve better symmetry when using whichever hand has the best angle.  Fortunately I'm ambidextrous and my left hand is almost as good as my right when sculpting.

Travelling down I shaped her nose to look cuter, built up her cheeks to look happier, shaped her chin to be longer and smoothed the lines of her neck.  Over and over, my fingers traveled up and down her face, removing imperfections and accentuating details.  When the clay on my index fingers dried and started scratching the sculpture I switched to using my middle fingers, then ring fingers, then little fingers, then thumbs.  By the time I was finished, each finger was covered in dry icing.  While smoothing the back of her neck, my fingers were too fat to reach up under the hair.  Too bad of my young helpers with small fingers wasn't here to help out.
Picture
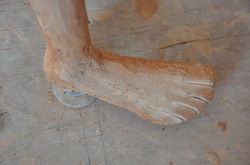
For the final layer of Winerstone on the feet I created tiny knobs on the sides where the ankle bones are and elongated the backs of the heels to create the Achilles tendons.  I added clay to the underside, top and instep of each foot to create strength and proportion.  Next I thickened the big toes and once they had dried I used a Dremmel tool (a small electrical grinder) to cut slices between the toes.

Picture
With the Dremmel tool I also carved fingers onto the hands.  These slits will guide me when applying icing layers to the hands and feet.

1 Comment
Laura Goulden & Brad Fahey
11/28/2012 03:19:30 am

Hi Ben
We were just checking out the progress on the Papaer Bag Princess. She is looking GREAT!
We are so proud to be a part of this beautiful sculpture you are creating along with so many others who have enjoyed participating!
KEEP UP THE GREAT WORK!
Brandon, Brad annd Laura! : )

Reply


Leave a Reply.

    Ben McCarl

    Thousands of potential sculptures lie within each and every uncut stone.  Sometimes the destiny is obvious when I see a stone and sometimes releasing the sculpture within is a long journey following countless hints and inspirations.

    Archives

    September 2013
    August 2013
    July 2013
    June 2013
    May 2013
    April 2013
    February 2013
    January 2013
    December 2012
    November 2012
    October 2012
    September 2012
    June 2012
    April 2012
    March 2012
    February 2012
    November 2011
    October 2011
    September 2011
    August 2011
    July 2011
    June 2011
    May 2011

    Categories

    All

    RSS Feed

Powered by Create your own unique website with customizable templates.