Ben McCarl
  • Home
  • Winterstone
  • Soapstone
  • Alabaster
  • Clay
  • Pictures
  • Blog
  • Contact

Inviting the Public to Help Build the Life Size Sculpture

9/27/2012

1 Comment

 
A thought about involving the public in creating this sculpture had been rolling around in my head for some time.  I'm proud every time I see the Celebration sculpture donated to the Guelph Youth Music Centre last year and suspect that anyone helping make the Paper Bag Princess sculpture would also feel proud any time that they visited the library.  They'd walk through the door, see the Princess waving hello to them and they's smile knowing that they played a role in her creation.

I set up an appointment with Kitty Pope to discuss this and drop off the scale model sculpture for the library for them to keep for a few weeks and generate public interest.  She loved the idea and so did the library staff gathered for the drop off and discussion.  Lisa  Cunningham issued a press release to local media and they acted quickly.  Tricia Stevenson of Rogers TV contacted me to set up a time to be on the television talk show Inside Guelph.  Jessica Lovell of the Guelph Tribune contacted me to set up a time for her to photograph a session with the public helping build the sculpture.  The Fountain Pen on line newspaper published the invitation for help.   Guelph Mercury published the invitation too.  And it worked wonderfully.  People started emailing me to set up times for them to participate. 


Picture
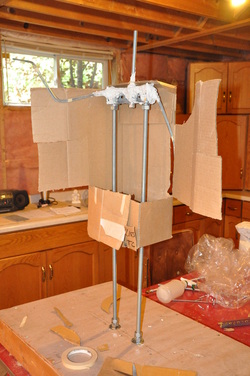
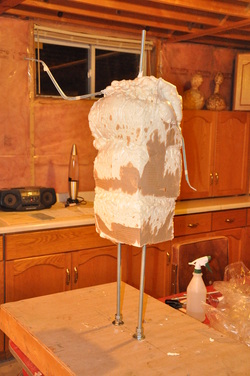
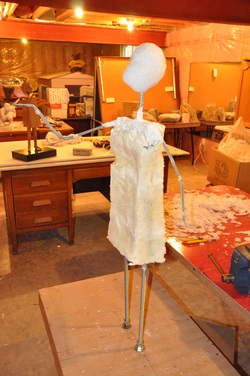
Valerie Smith along with her family Jillian, Garrett, Elena and Andy were the first to help.  They applied Winterstone to the lower part of the bag.  Their focus was to push the clay through the wire mesh as much as they could so that the sculpture would be strong.


Picture
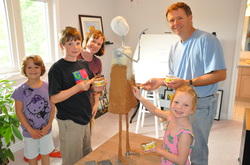
Karen McKay with her children Sarah Michael, Emily Michael, Colin Michael and Ryan Michael were the second group to help.  They applied Winterstone to the upper bag and had the same focus of pushing the clay through the mesh as much as they could.


Picture
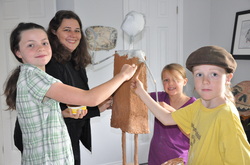
The third group was a combination of two requests.  Gord Sloan came on his own while Linda Clarke brought her granddaughter Peyton.  They built the shoulder, arms and top of the head.  Pushing the clay through the mesh was particularly important for the shoulders so that the arm support would connect with the bag.  That would help protect the finished sculpture if someone pulled down on the arm.

There is a lot more work to do in building the sculpture.  It needs four coats of Winterstone plus sanding and sealing.  Then the base needs slate tiles applied so I hope people keep volunteering.  My prediction is that I'll need help for another month.

1 Comment

Paper Bag Princess gets a Foam Core

9/15/2012

0 Comments

 
Picture
After waiting a few days for the Winterstone shoulders to harden, the sculpture was ready for a foam core.  To hold the spray foam in place, a box had to be secured to the frame.  I wanted to make sure that foam filled the entire box with minimal air pockets so I cut the box front into three sections so that foam could be added one third at a time.  Spray a can of foam into the bottom third then go away for a day to let it expand and harden.  Close the middle third of the box front and spray it full of foam then go away for another day.  Finally, close the top third and spray it full of foam then go away for a final day.


Picture
Surprise.  The foam expanded more than anticipated, blowing out the box seams.  No worries, just more material to carve away once the cardboard box was removed. 

Picture
Shave, shave and shave more.  Carve the foam down into a rectangular bag shape.  Measure the foam and compare it to the scale model Princess sculpture.  Carve more where needed until the body was finished.

Next I took an 8" foam ball that my daughter Ashley had given me last Christmas and used it as a starting point for the head.  I drilled a hole in the bottom and placed it over the neck rod.  Carve the ball into a head shape.  Redrill the hole to adjust its depth and angle.  Carve the head smaller.  Compare it to the scale model.  Carve again.  I left a nose shape on the foam head throughout the carving to help visualize the final sculpture's shape.  Then as a final step I cut the foam nose off.  If I had left it there, future layers of wire mesh and Winterstone would make the nose too large.  Better to start with no nose at all.

0 Comments

Paper Bag Princess Full Size Sculpture Begins

9/10/2012

0 Comments

 
Picture
I found enough surplus wood in the basement to build the base.  Each piece was carefully calculated, measured, cut then glued together.  If I had my father's woodworking skill the project would have been complete at that point, but I have an overcautious knack to leave extra material on everything I do, as a buffer just in case I need it later.  It's a useful characteristic when carving stone but not for building a wooden base.  The cross brace was too long and needed recut to fit.  The plywood top was oversize and needed trimmed on two sides for future slate tiles to fit.  I wonder if in the future I can mimic my father's brain when working with wood then revert to my brain for stone carving.  We'll have to wait for the next sculpture to find the answer.

Creating the threaded rod frame presented a few challenges too by having rod diameters twice as big as the scale model but using the same size of angle iron.  Nuts securing the vertical rods at the shoulder interfered with nuts securing the horizontal arm rods so I had to build extensions for the angle iron.  Then I tried bending the arm rods down at the shoulders and up at the elbows.  Impossible!  Too strong for my strength and tools.  I brought it up during a lunch conversation with some old friends at Blount and they suggested three alternatives:  1) Apply heat with a torch, 2) Use a pipe bender or 3) Use several smaller rods instead of one large rod.


Picture
With no access to a large torch, alternative 1) was out.  I bought a small pipe bender to give alternative 2) a try.  Even with all my strength, the rod wouldn't budge so I slipped meter long pipes over the handles to provide more leverage.  The assemble kept sliding around the table.  I clamped one of the long rods to the table and gave the free rod a heave.  Crack!  The pipe bender broke.  That finished alternative 2).  Off to the supply store I went to buy three smaller rods for alternative 3).  They fit through the holes in the mounting bracket.  Good!  I bent them with my hands.  Good!  I set then at the desired angle but they swung down from gravity.  Ugh!  With no nuts holding the arm rods in place they spun freely like the Princess had broken should bones.  Problemo!  Think, think, think, idea.  I opted to fill the connecting points with Winterstone, creating a giant cast that should hold the arms securely. 

0 Comments

    Ben McCarl

    Thousands of potential sculptures lie within each and every uncut stone.  Sometimes the destiny is obvious when I see a stone and sometimes releasing the sculpture within is a long journey following countless hints and inspirations.

    Archives

    September 2013
    August 2013
    July 2013
    June 2013
    May 2013
    April 2013
    February 2013
    January 2013
    December 2012
    November 2012
    October 2012
    September 2012
    June 2012
    April 2012
    March 2012
    February 2012
    November 2011
    October 2011
    September 2011
    August 2011
    July 2011
    June 2011
    May 2011

    Categories

    All

    RSS Feed

Powered by Create your own unique website with customizable templates.