Ben McCarl
  • Home
  • Winterstone
  • Soapstone
  • Alabaster
  • Clay
  • Pictures
  • Blog
  • Contact

GYMC Sculpture - Scale Model

9/24/2011

0 Comments

 
Picture
The next phase was to create a small scale (about 1/3 size) Winerstone sculpture to develop a plan of how to create the desired shape while learning some tricks and risks potential along the way.

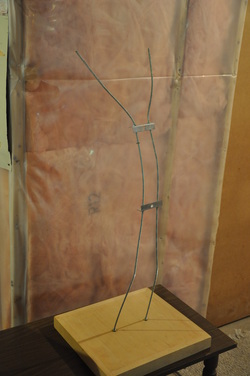
It needed a strong frame to build upon so off to Canadian Tire I went to brouse and buy.  Whatever materials I chose had to be available in small sizes for the scale model and large sizes for the final sculpture.  Up and down the aisles I wandered with many items on the shelf inspiring possible solutions.  Eventually I settled upon two threaded rods about 85 cm long and two brackets.  Each rod would be attached to the wooden base, run from the dancer's foot then up the leg, torso and out the arm.  Brackets would tie them together at the dancer's hips and shoulders.

Picture

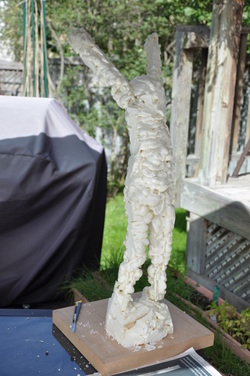
Next I needed some foam to build a lightweight core around the frame and chose Home Depot as the source.  Fortunately there were many types and sizes of foam available that people use as home insulation.  I loaded my cart with a few hard white sheets, a coil of flexible plastic insulation (that I ended up not using) and a spray can that creates foam to fill cracks.  Out on the back deck I sprayed foam around a test wire and was pleasantly surprised at the high potential.  Setting the dancer frame on the table, I sprayed foam aound the bottom then gradually worked my way up to create columns for the legs.  Round and round I slowly sprayed to form the torso, head and arms.  Numberous times the soft foam crumbled under its own weight but I found that occassional pauses to let the foam harden enabled me to build the entire core.

The full size sculpture will be to too large to build with spray foam so will need to have chunks of hard white foam sheets as filler with spray foam around them.

Picture

Files and sandpaper proved to be too abrasive to shape the foam but a sharp exacto knife worked wonderfully.  Gradually unwanted chunks were removed, revealing the dancer within.  It turns out the dancer is female.  I didn't know that until now.


Picture

Knowing that future layers of wire mesh and Winterstone would make the dancer bulky, I perfomed many iterations of thinning until the foam dancer looked like a grossly thin Nightmare Before Christmas character.  Feet and hands were completely removed so that they could be thin and simply made from wire and Winterstone.

Picture

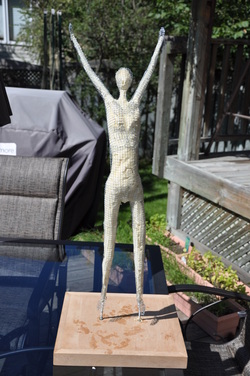
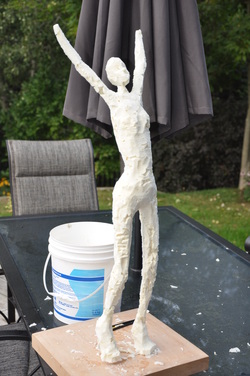
Its difficult to see in this photo, but the foam core is now wrapped in metal mesh and flat pieces of mesh show where the feet and hands will be.

Picture

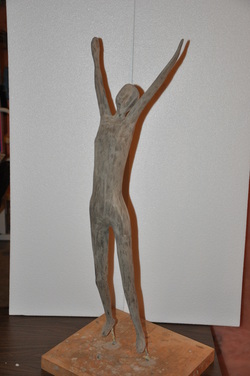
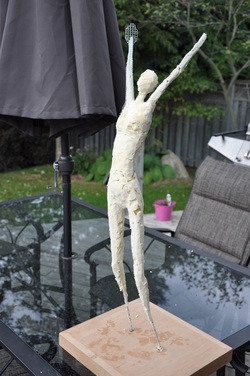
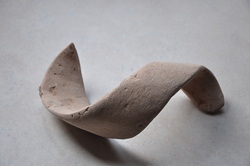
Finally two coats of raw sienna tinted Winterstone were applied, followed by two coats of tinted Winterstone icing.  The rough edges were shaped with coarse sandpaper between each coat.  Progressively finer grits of sandpaper were used to shape and smooth the surface.


This is your new blog post. Click here and start typing, or drag in elements from the top bar.
0 Comments

GYMC Sculpture

9/8/2011

1 Comment

 
The time is right to undertake something on my bucket list: to build a public sculpture, and after a little thought decided to do it for free... my second "create and donate" piece.  (I carved a small alabaster sailboat years ago and donated it to a Blount United Way fund raiser.  Joe Bigley won it... I wonder where it is now?).

This second "create and donate" piece will be for public display so must be large and tough enough to withstand some abuse.  Who to offer it to?  The GYMC (Guelph Youth Music Centre) came to mind because I support their mission and love their architecture.  A few emails later Brenda Gibson, the Executive Director met with me to discuss possible ideas and locations.  We opted for a floor piece of a dancer standing upright with hands extending high, about 2 metres tall, preferably bronze colour.  Stones such as alabaster would be so heavy in this size that I'd need a crane to move it around.  Cast bronze would also be too heavy and expensive for this project but I thought I could find a suitable alternative and either tint it, stain it, coat it or paint it.

Off to the Sculture Supply store in Toronto Pam and I headed for a shopping adventure.  After listening to their expert explain possible mediums, we opted for Winterstone, a product that behaves like clay when first mixed, hardens after one day to be carved like a soft stone then cures after several more days to be as hard as concrete.  The surface can be finished or painted in many ways to looks like fired clay, glazed clay, natural stone or metal.  The sculpture is created by carving a foam core and covering it with wire mesh then applying Winterstone over the top.  More layers are added along with fabric mesh for strength and shaped as needed to build the desired base.  An icing coat containing tint or metal dust is applied to achieve the final shape.  When I asked about how much it would cost to use bronze dust for the GYMC sculpture the expert would only say pricey, very pricey so that option is out for now.

We bought enough supplies to conduct some trials and will return for more purchases once I have a better understanding of what is needed.  The planned finish was to be created by chemically staining the hardened Winterstone surface but once we were home and read the warnings about acid, environmental and cancerous risks we returned the product and purchased two tints, raw umber and desert tan instead.
Picture
Trial #1: to learn about how Winterstone behaves.  I dug out an old test sculpture formed from a small galvanized steel sheet and used it as the base for trial #1.  Mixed Winterstone was much thicker than I anticipated; making me want to add more water but the instructions warned against this because it could cause shrinkage cracks and reduced strength.  The surface finish in the photo is rough but I'm sure that I can make is beautifully smooth and pure with another coat and sanding.

Picture
Trial #2: to see the raw umber colour.  For this trial I cut and formed a small piece of wire mesh to use as the base then applied tinted Winterstone.  I tried manipulating the Winterstone at various times during the three day curing process, spreading it with knife (OK), shaping with fingers (very good), filing with coarse file (chipped chunks from stone), filing with fine file (plugged file when stone too wet) and sanding (OK).  The raw umber colour turned out to be quite nice and would be dark and rich like weathered bronze in a finished state and go with many room colour schemes.

Picture
Trial #3: to see the desert tan colour.  Using the same procedure a Trial #2 but with a different tint, I created another test piece.  This colour is quite bright and striking but not a neutral which means the room colour must match of the colour scheme will scheme.

The Rotarty Club of Guelph meeting happened to be at the GYMC this week so I took the three test samples along with me to see which best suited the room decor.  White would be wonderful but tends to invite unwanted graffiti and will look dirty over time.  Theoretically Winterstone lasts about a hundred years so cleaning will undoubtedly be required throughout its life.  The desert tan colour conflicts with the present wall colour in the display room so is out as an option for this sculpture.  The raw umber will contrast the wall colour nicely, be easily viewed from the angle with a window behind the sculpture and complement the dark pipe infrastructure along the ceiling.   I decided to proceed with raw umber as the best choice when making the scale model.  We can always switch to a different tint for the full size sculpture.  The backup plan is to paint it bronze but we all know that paint looks great at the start then needs to be reapplied every five or ten years.

1 Comment

    Ben McCarl

    Thousands of potential sculptures lie within each and every uncut stone.  Sometimes the destiny is obvious when I see a stone and sometimes releasing the sculpture within is a long journey following countless hints and inspirations.

    Archives

    September 2013
    August 2013
    July 2013
    June 2013
    May 2013
    April 2013
    February 2013
    January 2013
    December 2012
    November 2012
    October 2012
    September 2012
    June 2012
    April 2012
    March 2012
    February 2012
    November 2011
    October 2011
    September 2011
    August 2011
    July 2011
    June 2011
    May 2011

    Categories

    All

    RSS Feed

Powered by Create your own unique website with customizable templates.