Ben McCarl
  • Home
  • Winterstone
  • Soapstone
  • Alabaster
  • Clay
  • Pictures
  • Blog
  • Contact

Creating Details

11/24/2012

1 Comment

 
Picture
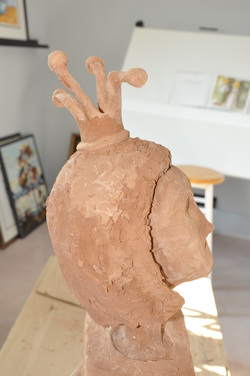
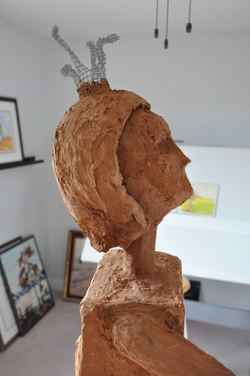
The base coat of the crown was complete and ready from me to begin forming details.  After applying a smoother coat the crown's prongs I added a blob of clay to the end of each and formed them into tiny balls.  Once they were dry I added a second coat to the balls to make them rounder.  Finally I added a rim around the base of the crown to make it look more regal.

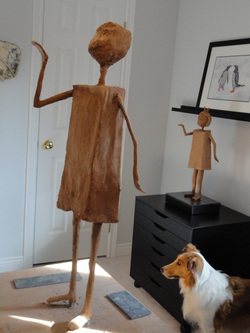
To give the bag character, I built up the Winterstone around the neck and arms to create the appearance of holes in the bag.

Next I applied the first layer of Winterstone icing to the face.  Icing is similar to clay but is less grainy when dry and can be sanded into a beautifully smooth surface.  I applied the icing with a knife, shaped and smoothed it as much as possible then smoothed and shaped it with my fingers.  After shaping her forehead I used my right index finger to shape her left eyebrow then with my left index finger I shaped her right eyebrow.  I find that I achieve better symmetry when using whichever hand has the best angle.  Fortunately I'm ambidextrous and my left hand is almost as good as my right when sculpting.

Travelling down I shaped her nose to look cuter, built up her cheeks to look happier, shaped her chin to be longer and smoothed the lines of her neck.  Over and over, my fingers traveled up and down her face, removing imperfections and accentuating details.  When the clay on my index fingers dried and started scratching the sculpture I switched to using my middle fingers, then ring fingers, then little fingers, then thumbs.  By the time I was finished, each finger was covered in dry icing.  While smoothing the back of her neck, my fingers were too fat to reach up under the hair.  Too bad of my young helpers with small fingers wasn't here to help out.

Picture
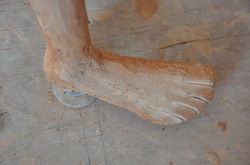
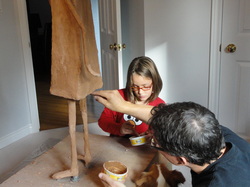
For the final layer of Winerstone on the feet I created tiny knobs on the sides where the ankle bones are and elongated the backs of the heels to create the Achilles tendons.  I added clay to the underside, top and instep of each foot to create strength and proportion.  Next I thickened the big toes and once they had dried I used a Dremmel tool (a small electrical grinder) to cut slices between the toes.

Picture
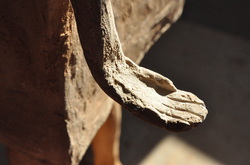
With the Dremmel tool I also carved fingers onto the hands.  These slits will guide me when applying icing layers to the hands and feet.

1 Comment

My Parents Help Out

11/24/2012

0 Comments

 
Picture
My father, Dave McCarl helped out with Celebration, my first WInterstone sculpture so it was important to me that he make a return appearance to help build the Princess sculpture too.  My mother, Norma also pitched in as we thickened the top of the bag and built up the crown.

Without thinking much about it, I assigned my mother the task of building up the top left side of the bag.  She quietly worked away then confessed that it wasn't going well and asked what she was doing wrong.  I looked and saw that she was packing clay where it belonged but wasn't spreading it out properly.  I tried to smooth it and instantly discovered the problem.  The Princess' arm was in the way and blocked me from positioning the knife at the necessary angle.  The only way I could get proper access was by kneeling on the floor and holding the knife in my left hand.  Sorry Mom!  Fortunately she'll still love me despite being assigned such a difficult task.

0 Comments

Working Alone

11/18/2012

0 Comments

 
Picture
After a week of vacation at the cottage I decided to spend some time working alone on the sculpture to make adjustments that improve her character.  The bag was too thin at the top, giving the Princess too tailored of a look.  I could either add Winterstone to the back of the top which would make her lean slightly backwards or add clay to the front and make her lean slightly forward.  I decided to opt for the leaning forward pose to make the princess look more eager when greeting people at the library.

Her head was tipped too far upwards.  It was positioned great for watching a dragon fly around the world but too high to "look at" people entering and exiting the library.  My challenge was to tip the head more straight ahead without making it unnaturally deep.  Here's something that you readers can try to help visualize the challenge.  Tip your head back and notice where the indents for your eyes are compared to where your protruding cheek bones are.  Now tip your head straight ahead and notice how the indents for your eyes have shifted down into the space where your protruding cheek bones used to be.  I had to add Winterstone to create new cheeks and eye indents while also bringing the forehead forwards and extending the chin downward to maintain the overall shape of the face.

Her hair needed to be more substantial and rounder, rather than hanging straight down the back so I added clay to the middle of the back.  I also brought the hair forward to cover her ears (or rather where the ears would be) and extended the lower front hair tips to hook more to the front.  

Then it was ready for the wire crown to be installed.  While cutting and bending the wire mesh into shape I smiled, recalling my seven year old helper Evan Lew telling me that the prongs in the scale model were not crooked enough.  Well Evan, I made the ones on the life size sculpture especially crooked and look forward to hearing your thoughts about them.

Her stance was too symmetrical so I tipped her right foot inward by adding clay to the inside of the toe area while tipping the left foot outward by adding clay to the outside of the toe area.  This created a more casual pose for the princess.  

Finally I extended the fingers on her hands and added thumbs.  I have not carved detailed fingers and toes on the princess yet but now have sufficient material to work with. 


0 Comments

My "Helpful" Dog Sarah

11/10/2012

1 Comment

 
Picture
I have a dog, Sarah who is about three years old and full of energy.  The breeder said she was a Sheltie but I am are sure there is something bigger and more energetic mixed inside.  Perhaps she is part Border Collie.  Her self proclaimed job is to bark and greet people whenever they arrive then bark to say goodbye when they leave.  She was very busy announcing the arrivals and departures of the many sculpture building volunteers.  

Fortunately most of the volunteers were dog lovers.  Unfortunately some of the children were more excited seeing the dog than helping build the Princess.  My wife Pam took on dog distraction duty by luring Sarah outside with baked beef bones where she could chew to her heart's content.  We went through a lot of bones and in the process made Sarah extra happy along with a bit extra heavy.

Picture
However, there were some days such as during this one with Sofia when we sculptors focused on the Princess and Sarah wandered around freely.  While we knelt on the floor to work on the sculpture's legs, Sarah decided to curl up in my lap and be close to the action.  I am used to her being involved in anything I do around the house so I simply worked around her.  

At one point she tried nibbling on bits of dried Winterstone that had fallen on the floor and I suspect she would have eaten more if we had not told her to stop.

1 Comment

    Ben McCarl

    Thousands of potential sculptures lie within each and every uncut stone.  Sometimes the destiny is obvious when I see a stone and sometimes releasing the sculpture within is a long journey following countless hints and inspirations.

    Archives

    September 2013
    August 2013
    July 2013
    June 2013
    May 2013
    April 2013
    February 2013
    January 2013
    December 2012
    November 2012
    October 2012
    September 2012
    June 2012
    April 2012
    March 2012
    February 2012
    November 2011
    October 2011
    September 2011
    August 2011
    July 2011
    June 2011
    May 2011

    Categories

    All

    RSS Feed

Powered by Create your own unique website with customizable templates.