Ben McCarl
  • Home
  • Winterstone
  • Soapstone
  • Alabaster
  • Clay
  • Pictures
  • Blog
  • Contact

Week Five of People Helping Build the Princess Sculpture

10/28/2012

0 Comments

 
Picture
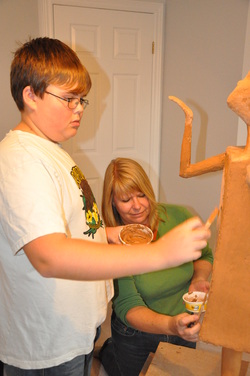
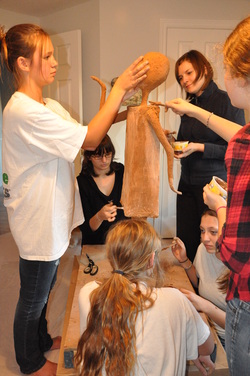
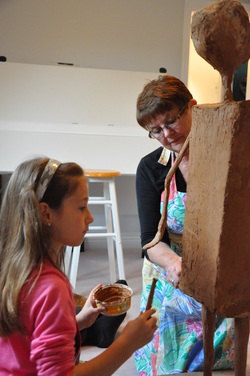
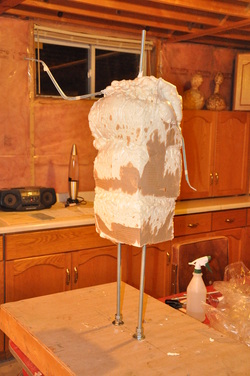
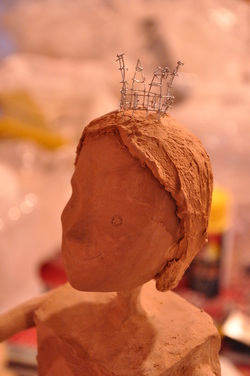
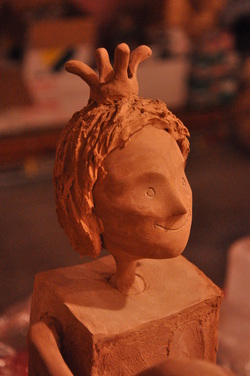
After Micky McClenaghan finished applying Winterstone to the princess' side and arm I decided that the head was shaped sufficiently to start building up the hair area.  Micky studied the hair that Michael Martchenko drew in the Munsch book, looked at my interpretation on the scale model sculpture then started applying clay to the life size sculpture's head.  Many additional layers will be needed to mimic the puffy hair pictured in the book but we're off to a great start.

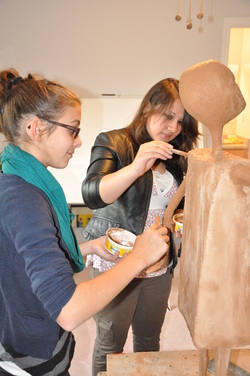
His mother, Bernadette applied clay to the arm and legs.  She found that applying Winterstone to the curves of the hands and feet were the most satisfying strokes.  Interesting.  The hands are one of the more interesting areas where people like applying clay.

Picture
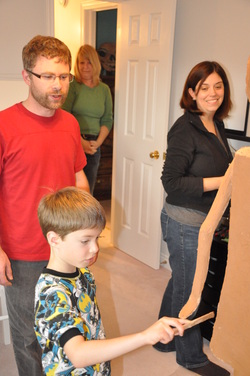
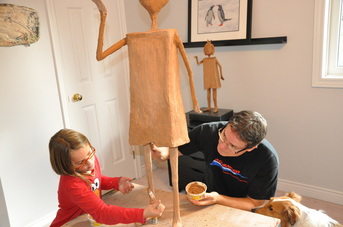
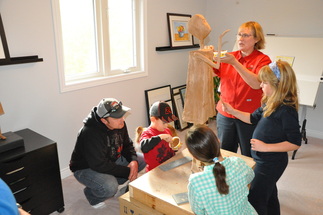
Sebastian Whitehouse along with his parents Kim and Jamie applied clay to the sculpture.  I enjoy watching family dynamics as they work together mixing powder, tint and water to create clay of proper consistency then sharing the clay while each applying it with their own knives.  When creating art, I get happily engrossed in the process and apparently my volunteers do too.

Picture
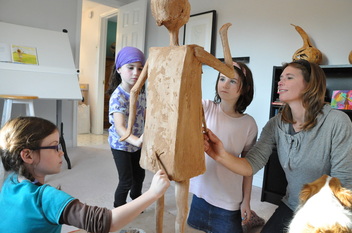
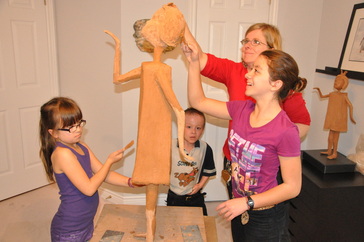
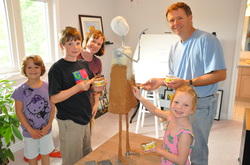
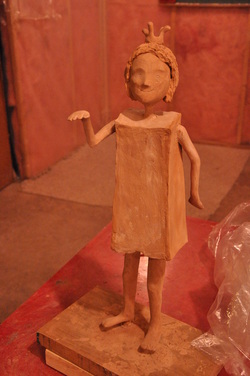
Ilse Remijn brought her children Carmen, Ismay and Olwrn Reed to help create the sculpture.  They focused on building up the bag's thickness, making the corners sharper and filling hollow areas.  Olwrn Reed was only five years old, making her one of the youngest people to help build the sculpture.  The ages of all participants ranged from five to eighty one.  That's quite a spread!

Picture
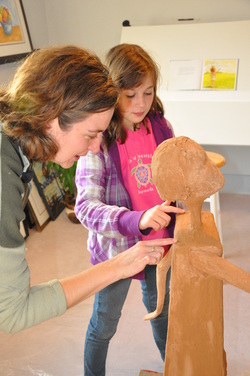
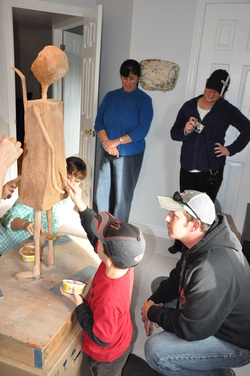
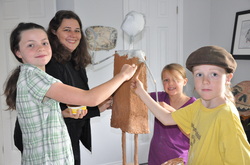
Kate and Hannah Reilly built up the top of the bag and the shoulders.  Unfortunately Hannah was sick which limited how long she could help but she didn't want to cancel the appointment for fear of missing the opportunity of building the Paper Bag Princess sculpture.  She commented that the sculpture "Looks a bit like a huge cake when you're making it with icing."

Picture
Lynda Jessop-Lew brought her children Evan, Meredith and Kaitlyn to help build the sculpture.  Mid way through the session Evan said, "I hate to tell you this but there's a big problem with your sculpture."  I asked him to explain.  He walked over to the picture of the princess in the book and pointed to the crooked prongs on top of her crown then walked over to the scale model sculpture and said that these points were too straight.  Wow, how true.  How observant!  I'll have to make sure that they're more crooked on the life size sculpture.

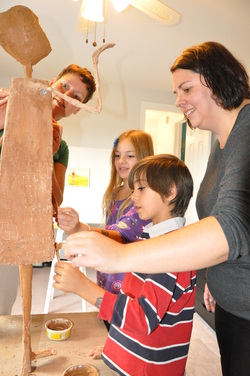
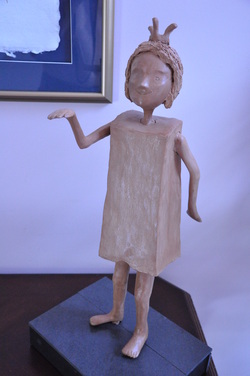
It reminds me of the numerous times that children come into the studio, look at the picture in the book and compare it to the sculpture then tell me that the left arm should be bent more.  True, it is in the book but I took artistic license to make it straighter and behind the princess for the sculpture.  I think it provides better balance.  They always accept my explanation but sometimes the look in their eyes indicate that they think I'm off side.

0 Comments

Week 4 of People Helping Build the Princess Sculpture

10/22/2012

1 Comment

 
Picture
This week I had the pleasure of working with volunteers from Guelph Public Library TAG (Teen Advisory Group).  Their care and artistic talent was truly impressive.  Susan Fayez added Winterstone clay to improve the shape of the head, arm and calf while Zoe Nield improved the shape of the head, arm and leg.

With TAG people I got to explain the sculpture's needs at a more fundamental level.  Rather than saying, "Make the arm thicker," I said, "Add lots of clay to the top of her upper arm to build up her biceps, then a little less under it because triceps are smaller.  For the lower arm make it larger and round near the elbow but thinner and flatter near the wrist."  They caught on instantly, giving the sculpture more humanly proportions.


Picture
The second half of TAG volunteers was a larger group but we managed to not interfere with each other in tight quarters.  Natasha H helped layer clay on the arms and legs.  Liz Legere worked on the legs and arms and found that, "It was fun playing with the mushy cement."  Liz Brooks shaped the bag, legs, arms and neck.  Nicola Tourangeau helped with the head and neck and commented that her favourite quote from the book was, "Ronald, you are a bum."  Inessa Townsend-Fish helped with the arms, legs and bag.  Elissa Davidson, the group leader helped with the arms, bag corners and elbow.

TAG people were the first to add a nylon mesh layer with the Winterstone clay layer.  It proved challenging, getting the mesh stay in place while bending around corners such as the elbows but we found success by slicing the mesh at strategic locations and drying the clay to the perfect consistency (wet enough to mold but dry enough to hold its shape).  Elissa claimed that, "The elbow began as our nemesis, but I think it worked out."  Yes Elissa, I can confirm that that elbow looked great the following day once the Winterstone clay had dried more.

TAG sculptors instinctively knew to look at the sculpture from different angles to evaluate proportions and make corrections where needed.  At the end of the session one of them stood back, looked at the sculpture and compared it to the Michael Martchenko picture in the book then said that the sculpture's knees were too low.  I looked at them, thought a moment then agreed.  "Thanks," I replied.  "We can shift the knees upward with subsequent clay layers."

1 Comment

Week 3 of People Helping Build the Princes Sculpture

10/17/2012

1 Comment

 
Picture
Today's helper had symbolic significance.  Sofia Ciaravella was the daughter of Elizabeth, the girl who the Paper Bag Princess was named after.  Wow!  Now we have two generations of key participants, Elizabeth for the book princess and Sofia for the sculpture princess.

With only one helper today, I had time to mix and apply many batches of WInterstone clay.  Sofia's grandmother, Susan Moziar was kind enough to snap a photo of Sofia and me working together.  We shaped the head, arms and legs, focusing on building up the thighs.

Picture
This was three groups combined.  I recognized Mary Mindorff Murphy's face the second she walked through the door as someone who used to work at Blount with me (although I hadn't recognized her name from emails setting up the time slot).  As a bonus, she gave me two old books about sculpting that weren't any use to her... but very interesting to me.  Mary applied Winterstone clay to the upper arms and cheeks of the princess.

The second part of the group was Brandon Fahey and his father Brad.  They adapted well to sculpting, treating it with care like icing a cake.  They worked on the princess' left hand, the back of the bag and the bottom of the bag.  Since we couldn't tip the sculpture on its side to work on the bottom, Brandon and Brad had to fight gravity, pushing the clay up under the bag.  By sticking clay along the edge they managed to extend the bag downward, creating the impression that the bag sides were thin walls like paper.  Brandon liked the way clay felt as it dried on his fingers and tried numerous times to convince his father to let him not was up.  Brad held firm, managing to protect his car and house from a trail of Winterstone hand prints.

The third part of the group was Jessica and Kate Nixon.  They enjoyed rubbing Winterstone to the princess' legs, arms and bag.  They loved the feel of Winterstone and had the messiest hands of any helpers to date.


Picture
Mothers Laura Goulden and Dee Nixen were in the room but decided to stand back, watch, take pictures and chat with the sculptors rather than getting their hands dirty.  

1 Comment

Questions People Ask While Creating the Sculpture

10/13/2012

1 Comment

 
While helping build the sculpture my helpers and I chat about whatever comes to mind.  One common question is "Why did I choose Robert Munsch?"  I became a fan of his books while reading them to my children many years ago.  I loved reading lines like "Hey mud puddle!" and "You look like a real prince but you are a bum."  In addition, Michael Martchenko had created illustrations that were engaging and fun to look.  I'd read a page then pause, spending a few moments studying at the picture and finding interesting, subtle details.

Another common question is, "Why the Paper Bag Princess?"  The primary reason is because I like the story line and messages within.  I like dragons, princes and princesses, I like the flipped roles where the princess has to save the prince, I enjoy the clever way the princess beat the dragon by tricking him into tiring himself out by flying around the world and I'm impressed by princess' rejection of the materialistic prince.

Something I explain to everyone when they arrive is why I chose this particular picture from the book as a basis for the sculpture.  Michael Martchenko created brilliant visuals for the entire book but some are more sculpture suitable than others.  I welcome blog readers to grab a copy of the book and look through it with me.  In the first illustration the princess is wearing a gown but the sculpture needs to be wearing a paper bag.  In the second illustration she's wearing nothing except a cloud of smoke.  In the third she's wearing a paper bag but looks angry.  In the fourth the dragon head is sticking our the door of its den.  As a sculpture, this risks looking like a decapitated dragon.  Not good.  For the next three illustrations the dragon steals the show so that anyone seeing a sculpture would instantly see the dragon, making the princess appear irrelevant.  The next illustration is perfect!  The princess is waving goodbye to the dragon as he flies around the world.  What a wonderful pose for a library entrance.  She'll be waving hello and goodbye to people as they arrive and leave.  She'll be waving hello and goodbye to people as they read stories travelling through the adventures within.  None of the following illustrations of the Paper Bag Princess fit the library sculpture so well.
1 Comment

Week Two of People Helping Build the Princess Sculpture

10/9/2012

0 Comments

 
Picture
The second week of people helping build the sculpture started with the group of Bonnie Hale along with her children Maeve and Sam Konyer.  Joining them was Cindi Conlon who happened to be a neighbour from our old neighbourhood.  That provided a surprise bonus for the project, getting to catch up with a friend from the past.

This group completed the application of the first layer of Winterstone to the head and neck then began shaping the sculpture by applying the second layer of Winterstone clay to the thighs and paper bag.

A side note: All four of these participants were left handed causing me to be "left out" as the only right handed sculptor.

Picture
One day when my wife's parents Shirley and John Burrows were over for a visit I mentioned that the public were invited to help build the Paper Bag Princess sculpture.  They sheepishly asked if family was allowed to participate.   "Of course", I replied.  Later that day when I logged onto email, there was a request from them. How sweet!

Another person expressing interest was Andrew Skelton, a friend of Justin Wolting, my son-in-law.  He saw my sculptures during events surrounding Justin and Sondra's wedding and jumped at the chance to participate creating one.

With a group consisting of all adults, I took the opportunity to lie the sculpture on her side to provide easy access to the bottom of the bag.  It's much easier to apply Winterstone clay when you aren't fighting gravity.  Once the bottom was complete we stood the princess back up applied clay to give her heftier thighs and a thicker right arm.


Picture
More helping relatives stepped up to try their hands at sculpting WInterstone.  My aunt Donna Kramp brought her granddaughter Maleline Zammit who loves craft building to apply a clay layer.  

Apparently another life skill helps develop sculpting skill.  Madeline said, "It's like putting peanut butter on toast."

This team of two focused on applying a layer of WInterstone to cover up the wire mesh pattern showing through the paper bag part of the sculpture.

0 Comments

Inviting the Public to Help Build the Life Size Sculpture

9/27/2012

1 Comment

 
A thought about involving the public in creating this sculpture had been rolling around in my head for some time.  I'm proud every time I see the Celebration sculpture donated to the Guelph Youth Music Centre last year and suspect that anyone helping make the Paper Bag Princess sculpture would also feel proud any time that they visited the library.  They'd walk through the door, see the Princess waving hello to them and they's smile knowing that they played a role in her creation.

I set up an appointment with Kitty Pope to discuss this and drop off the scale model sculpture for the library for them to keep for a few weeks and generate public interest.  She loved the idea and so did the library staff gathered for the drop off and discussion.  Lisa  Cunningham issued a press release to local media and they acted quickly.  Tricia Stevenson of Rogers TV contacted me to set up a time to be on the television talk show Inside Guelph.  Jessica Lovell of the Guelph Tribune contacted me to set up a time for her to photograph a session with the public helping build the sculpture.  The Fountain Pen on line newspaper published the invitation for help.   Guelph Mercury published the invitation too.  And it worked wonderfully.  People started emailing me to set up times for them to participate. 


Picture
Valerie Smith along with her family Jillian, Garrett, Elena and Andy were the first to help.  They applied Winterstone to the lower part of the bag.  Their focus was to push the clay through the wire mesh as much as they could so that the sculpture would be strong.


Picture
Karen McKay with her children Sarah Michael, Emily Michael, Colin Michael and Ryan Michael were the second group to help.  They applied Winterstone to the upper bag and had the same focus of pushing the clay through the mesh as much as they could.


Picture
The third group was a combination of two requests.  Gord Sloan came on his own while Linda Clarke brought her granddaughter Peyton.  They built the shoulder, arms and top of the head.  Pushing the clay through the mesh was particularly important for the shoulders so that the arm support would connect with the bag.  That would help protect the finished sculpture if someone pulled down on the arm.

There is a lot more work to do in building the sculpture.  It needs four coats of Winterstone plus sanding and sealing.  Then the base needs slate tiles applied so I hope people keep volunteering.  My prediction is that I'll need help for another month.

1 Comment

Paper Bag Princess gets a Foam Core

9/15/2012

0 Comments

 
Picture
After waiting a few days for the Winterstone shoulders to harden, the sculpture was ready for a foam core.  To hold the spray foam in place, a box had to be secured to the frame.  I wanted to make sure that foam filled the entire box with minimal air pockets so I cut the box front into three sections so that foam could be added one third at a time.  Spray a can of foam into the bottom third then go away for a day to let it expand and harden.  Close the middle third of the box front and spray it full of foam then go away for another day.  Finally, close the top third and spray it full of foam then go away for a final day.


Picture
Surprise.  The foam expanded more than anticipated, blowing out the box seams.  No worries, just more material to carve away once the cardboard box was removed. 

Picture
Shave, shave and shave more.  Carve the foam down into a rectangular bag shape.  Measure the foam and compare it to the scale model Princess sculpture.  Carve more where needed until the body was finished.

Next I took an 8" foam ball that my daughter Ashley had given me last Christmas and used it as a starting point for the head.  I drilled a hole in the bottom and placed it over the neck rod.  Carve the ball into a head shape.  Redrill the hole to adjust its depth and angle.  Carve the head smaller.  Compare it to the scale model.  Carve again.  I left a nose shape on the foam head throughout the carving to help visualize the final sculpture's shape.  Then as a final step I cut the foam nose off.  If I had left it there, future layers of wire mesh and Winterstone would make the nose too large.  Better to start with no nose at all.

0 Comments

Paper Bag Princess Full Size Sculpture Begins

9/10/2012

0 Comments

 
Picture
I found enough surplus wood in the basement to build the base.  Each piece was carefully calculated, measured, cut then glued together.  If I had my father's woodworking skill the project would have been complete at that point, but I have an overcautious knack to leave extra material on everything I do, as a buffer just in case I need it later.  It's a useful characteristic when carving stone but not for building a wooden base.  The cross brace was too long and needed recut to fit.  The plywood top was oversize and needed trimmed on two sides for future slate tiles to fit.  I wonder if in the future I can mimic my father's brain when working with wood then revert to my brain for stone carving.  We'll have to wait for the next sculpture to find the answer.

Creating the threaded rod frame presented a few challenges too by having rod diameters twice as big as the scale model but using the same size of angle iron.  Nuts securing the vertical rods at the shoulder interfered with nuts securing the horizontal arm rods so I had to build extensions for the angle iron.  Then I tried bending the arm rods down at the shoulders and up at the elbows.  Impossible!  Too strong for my strength and tools.  I brought it up during a lunch conversation with some old friends at Blount and they suggested three alternatives:  1) Apply heat with a torch, 2) Use a pipe bender or 3) Use several smaller rods instead of one large rod.


Picture
With no access to a large torch, alternative 1) was out.  I bought a small pipe bender to give alternative 2) a try.  Even with all my strength, the rod wouldn't budge so I slipped meter long pipes over the handles to provide more leverage.  The assemble kept sliding around the table.  I clamped one of the long rods to the table and gave the free rod a heave.  Crack!  The pipe bender broke.  That finished alternative 2).  Off to the supply store I went to buy three smaller rods for alternative 3).  They fit through the holes in the mounting bracket.  Good!  I bent them with my hands.  Good!  I set then at the desired angle but they swung down from gravity.  Ugh!  With no nuts holding the arm rods in place they spun freely like the Princess had broken should bones.  Problemo!  Think, think, think, idea.  I opted to fill the connecting points with Winterstone, creating a giant cast that should hold the arms securely. 

0 Comments

Paper Bag Princess Scale Model Completed

6/29/2012

1 Comment

 
Picture
Pam and I traveled to a local floor tile store to check out their natural stone tiles.  With a sample of Winterstone tinted the same colour as the princess we wandered about, holding up the sample up to ceramics, marble, granite, slate, etc. then selected a black slate as the perfect match.  We bought a few tiles, took them home, marked the needed cuts to create the base and returned them to the vendor for cutting.  

I used my angle grinder to carve four small semi-circles for the posts under the princess' feet to pass through.

The wooden under-structure that the princess was standing on needed to be cut smaller on two sides to fit the slate.  This was scary.  Supporting the princess on a table I skimmed a bit of wood off using a skill saw, all the while hoping that the vibrations wouldn't create fine cracks in the Winterstone.

Glue two pieces of slate onto the sides of wood base, clamp them and wait for it to dry.  Glue two more side pieces, clamp and wait.  Then the final two pieces were glued on top.

The final step was sealing the Winterstone and slate.

The scale model of the princess now stands on a table in our front hall.  With so many other things on my plate right now (kitchen being renovating and my daughter, Sondra's wedding coming up) I decided to wait a month before starting on the life size princess for the Guelph Public Library.


1 Comment

Paper Bag Princess - Scale Model in Final Sages

4/22/2012

0 Comments

 
Picture
It took a long time deliberating to decide how to detail the princess's face.  Full facial detail would be too real while a round circle with features drawn on would be too cartoon-ish.  I settled on proper facial form with nose, cheek bones, etc but with the eyes drawn on as circles and a sweeping smile drawn on for the mouth.  This was a perfect compromise that matched the book illustrations.

Once the face was complete I added a base coat to build up hair volume and added a wire mesh for the crown's foundation.

Picture

A layer of Winterstone was added to the crown.  During sanding one day later I inadvertently bent one of the prongs.  Fortunately Winterstone is more forgiving than natural stone and I was able to make a successful repair.  My big, clunky fingers had a heck of a time fashioning icing in the gaps between the crown's prongs.  Every time I smoothed the finish of one prong with the skin on my finger, my fingernail would accidentally slice a scar line into an adjacent prong trapping me in a cycle of eternal rework.

To make the disheveled hair I applied a smooth layer of icing and carved swooping lines into it with a plastic knife.  Drawing the lines in a downward direction was pulling the body out of the princess's hair so I switched to pulling the knife in an upward direction.  The combined chaos created the proper impression.

Picture

From a artistic perspective I preferred to have the fingers somewhat open while waving but individual fingers are weak and prone to breakage, especially in the hands-on environment of the library.  Closing the fingers into a tighter wave was prudent.  

Picture

The paper bag is the last area to finish.  It's almost time to go shopping an find a suitable stone cover for the base.

0 Comments
<<Previous
Forward>>

    Ben McCarl

    Thousands of potential sculptures lie within each and every uncut stone.  Sometimes the destiny is obvious when I see a stone and sometimes releasing the sculpture within is a long journey following countless hints and inspirations.

    Archives

    September 2013
    August 2013
    July 2013
    June 2013
    May 2013
    April 2013
    February 2013
    January 2013
    December 2012
    November 2012
    October 2012
    September 2012
    June 2012
    April 2012
    March 2012
    February 2012
    November 2011
    October 2011
    September 2011
    August 2011
    July 2011
    June 2011
    May 2011

    Categories

    All

    RSS Feed

Powered by Create your own unique website with customizable templates.